Законодательство
I. Urban design considerations
1. Obstructions |
|
1. Problem identification Obstacles and protruding elements in the path of travel. Low overhanging signs. Lack of warning signs around obstructions. 2. Planning principle To design a barrier-free path for the safety and independence of disabled people, especially the sightless. 3. Design considerations 3.1 General • Obstructions include street furniture, traffic signs, direction signs, street plans, bollards, plants, trees, shop awnings and advertising signs, etc. • Obstructions should be placed outside the path of travel wherever possible. • Obstructions in the pathway should be easy to detect, and if possible, should be placed along one continuous line. • Protruding elements should be avoided. • The minimum width of a clear unobstructed path should be 0.90 m. 3.2 Obstructions on the pathway surface • Obstructions on the pathway surface should have one of the following design features in order to be detected by the cane of a sightless person:
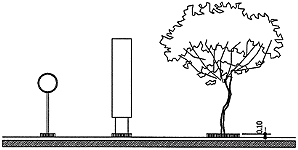
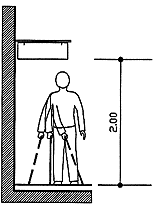
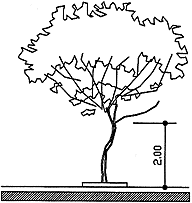
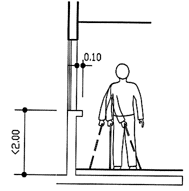
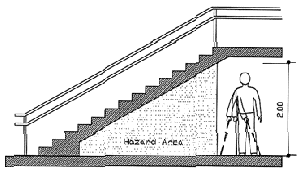
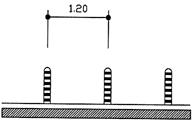
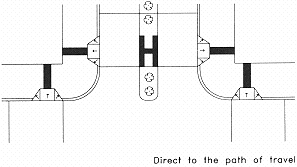
3.3 Overhanging obstructions • Overhanging signs in accessible pathways should be mounted at a minimum clear height of 2.00m to allow a sightless person to pass safely (fig. 4). • Overhanging vegetation should be clipped to a minimum clear height of 2.00 m (fig. 5). • Undetectable obstacles mounted lower than 2.00 m may project a maximum distance of 0.10m into the pathway. Otherwise they should be recessed or covered (fig. 6). 3.4 Fixed poles • Fixed poles should have contrasting durable colour marking strips of at least 0.30 m in length, placed with the centre line at a height between 1.40 m and 1.60 m, to warn pedestrians with limited vision (fig. 1). 3.5 Garbage bins • Garbage bins attached to lampposts should not face the line of pedestrian flow so as to minimize collisions and should be painted in a contrasting colour so that people with limited vision may easily identify them (fig. 7). 3.6 Spaces below ramps and stairs • Spaces below ramps and stairs should be blocked out completely by protective rails or raised curbs or marked with a tactile surface (fig. 8). 3.7 Bicycle stands • Bicycle stands should be located on a raised platform. 3.8 Wires • Stabilizing wires and wire netting should be painted in a contrasting colour or blocked out. 3.9 Bollards (1) (fig. 9) • Bollards should be painted in a contrasting colour or in coloured stripes. • The distance between guiding posts should be around 1.20 m. 3.10 Roadworks • Excavations and roadworks form temporary obstructions within the route of travel. They should be protected by easily detected continuous barriers, scaffolding, and fences for safety reasons. • Barriers should be identified by stripped colour markings and should be lit at night, to guide people with limited vision. • The barrier height should be between 0.75 m and and 0.95 m. The distance between the bottom of the barrier and the pathway surface should not exceed 0.10 m. 4. Existing constructions • Existing obstructions within the path of travel should be redesigned to conform to all the above requirements Notes: |
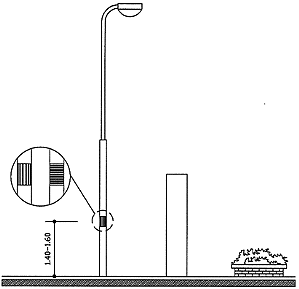 Fig. 1
|
2. Signage |
|
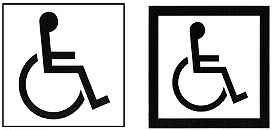
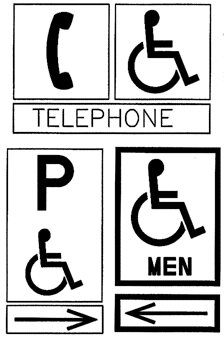
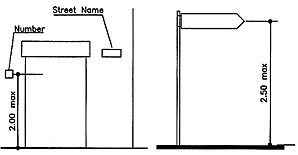
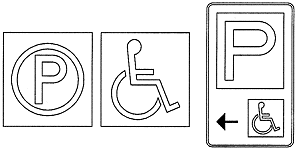
1. Problem identification Orientation difficulties resulting from illegible directional signs, street names and numbering and/or the lack of them. Pedestrian accidents due to badly positioned signs. Hazards due to lack of warning and traffic signals. Non-identification of access routes and accessible facilities. 2. Planning principle To facilitate orientation mainly for the disabled. 3. Design considerations 3.1 General • Signage include direction signs, signs of locality, street names and numbering, information signs, etc. • All types of signs should be visible, clear, simple, easy to read and understand, and properly lit at night. • In general, signs should not be placed behind glass because of possible reflection. • Signage placed on the pedestrian path of travel are considered obstructions; thus, they should be detectable (see Obstructions). 3.2 International symbol of accessibility • Accessible spaces and facilities should be identified by the international symbol of accessiblity (fig. 1). • The symbol is composed of a wheelchair figure with either a square background or a square border (fig. 2). • Contrasting colours should be used to differentiate the figure from the background. The commonly employed colours are white for the figure and blue for the background. • The wheelchair figure should always be seen from drawn facing right. • For completely accessible buildings, it is enough to have one explanatory sign at the entrance. 3.3 Direction signs • Graphic or written directions should be used to indicate clearly the type and location of the available facility (fig. 3). • Directional signs need not be excessive in number, but they should be placed at main entrances and doors and in places where changes in direction or level occur. 3.4 Street names • Fixed signs indicating street names should be placed at a maximum height of 2.50 m (fig. 4). 3.5 House numbers • Fixed signs indicating house numbers should be placed at a maximum height of 2.00 m (fig. 4). 3.6 Maps and information panels • Maps and information panels at building entrances, along roads, and on public buildings should be placed at a height between 0.90 m and 1.80 m (fig. 5). 3.7 Installation • Signs can be wall-mounted, suspended or pole-mounted. (a) Wall-Mounted signs:
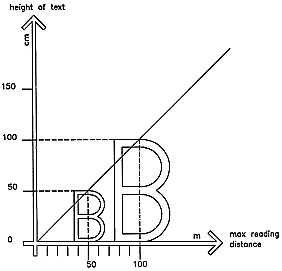
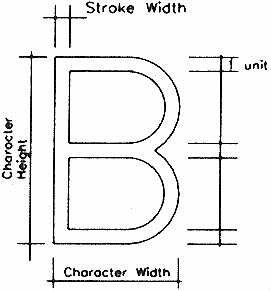
(b) Overhanging signs:
(c)Pole-Mounted signs:
3.8 Shape of signboards • Information signboards should be rectangular. • Warning signboards should be triangular. • Interdictory signboards should be circular. 3.9 Colour • The colour of signs should contrast with the surrounding surface so as to be clearly distinguishable. • The commonly used colours are: white, black, yellow, red, blue and green. • The colour combinations red/green and yellow/blue should not be used in order to avoid confusing colour- blind persons. 3.10 Surface • The sign surface should be processed to prevent glare. • Engraved texts should be avoided unless they are coloured. Relief prints are advisable. • Key plans, orientation signs and push buttons in lifts must have a text in Braille or in relief. (1) 3.11 Lettering • The size of letters should be in proportion to the reading distance (fig. 6). • Character width-to-height ratio should be between 3:5 and 1:1 and the character stroke width-to-height ratio should be between 1:5 and 1:10 (fig. 7). • The letters and signs should preferably be raised at least 1 mm from the background, to enable sightless people to read the information using the tips of their fingers. • The smallest letter type should not be less than 15 mm. • Normal spacing between words and letters should be used. 4. Existing constructions • The international symbol of accessibility should be added to mark accessible spaces and facilities. • Directional signs should be added to indicate clearly the location and function of accessible spaces and facilities. • Signs that do not comply with the above design requirements should be modified or replaced. Notes: (1) Not all sightless persons are familiar with Braille. |
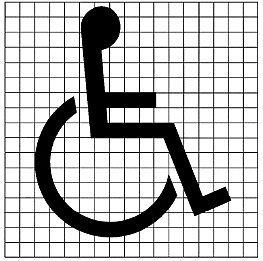 Fig. 1
|
3. Street furniture |
|
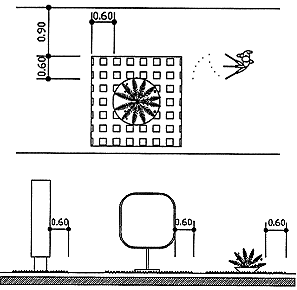
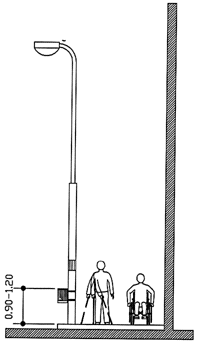
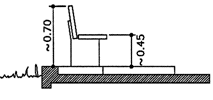
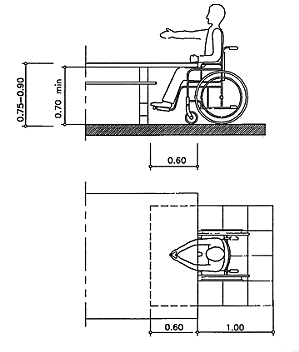
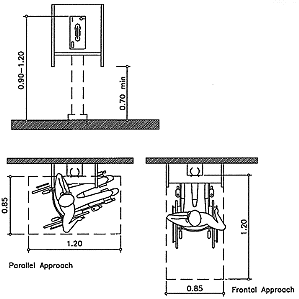
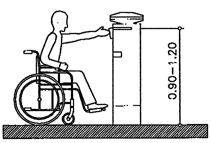
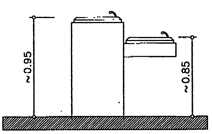
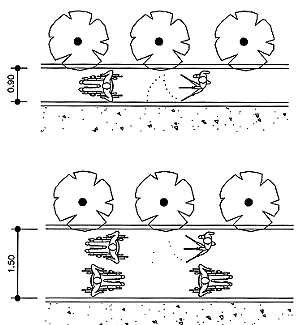
1. Problem identification Lack of or improper design of street furniture. Obstructed pathways. Inaccessible street facilities. 2. Planning principle To design accessible amenities convenient to all people, without obstructing the free passage of pedestrians along travel routes. 3. Design considerations 3.1 General • Street furniture includes bus stops, benches, mail boxes, lampposts, signboards, telephone booths, public toilets, newspaper kiosks, planting tubs, garbage bins, etc. 3.2 Location (1) • Street furniture should be located so as to allow for the free passage of all people without creating hazards. • Textural changes in the footpath surface help sightless people to identify the location of public amenities (see Obstructions). 3.3 Resting facilities • Level rest areas with seats are helpful for all pedestrians, especially for those with mobility problems. • Resting facilities should be placed outside the main circulation path in public parks, recreational places, pathway crossings, in front of accessible entrances and exits and wherever necessary. • Resting facilities should be provided at regular intervals between 100.00 m and 200.00 m (2) (fig. 1). • Some seating accommodations should be placed close to public toilets, telephones, etc. • Resting spaces with benches should allow a minimum of 1.20 m of adjoining space for a wheelchair (fig. 2). • Public seats and benches should be approximately 0.45 m above floor level, with backrests at approximately 0.70 m above floor level (fig. 3). • The height of a table should be between 0.75 m and 0.90 m and the minimum depth under the table should be 0.60 m, in order to fit a wheelchair under all sides (fig. 4). 3.4 Public telephone booths (3) • At public telephone booths, one telephone should be accessible to a wheelchair user and another to a person with a hearing impairment. • Telephones for the hearing impaired should be equipped with hearing aid devices and amplifiers. The location of telecommunication devices should be indicated by signs. • A push-button telephone numbering system, with raised letters which can also be read by touch, should be used for the convenience of sightless users and other disabled people. A dial numbering system is not recommended unless the dial tension is reduced so as to require less effort to rotate the dial. • A folding seat should be provided in accessible telephone booths for the convenience of people with mobility problems. • The minimum unobstructed area in front of the telephone counter should be 1.20 m x 0.85 m, allowing either a parallel or a frontal approach (fig. 5). • The coin slot should be mounted at an accessible comfortable height between 0.90 m and 1.20 m. • The telephone cord length should be at least 0.75m. • Accessible public telephones should be marked by appropriate signs. 3.5 Mailboxes • Mailbox slots should be mounted at an accessible height between 0.90 m and 1.20 m (fig. 6). 3.6 Water Fountains (fig. 7) • Drinking fountain spouts should be located at an approximate height of 0.90 m. • Drinking fountains can have two spouts located at different heights, one convenient to wheelchair users at approximately 0.85 m, and one at approximately 0.95 m for non-disabled people. 3.7 Signs (see Signage; Pedestrian Crossings) 3.8 Garbage bins (see Obstructions) 3.9 Public toilets (see Rest Rooms) 3.10 Ticket vending machines (see Height Limits) 4. Existing constructions • Resting facilities should be rearranged where possible to allow an adjoining space for a wheelchair. • Facilities mounted at a maximum height of 1.40 m are acceptable, while those located at a higher level should be modified. Notes: (1) Landscaped strips act as a buffer zone between pedestrian and vehicular zones, and street furniture can be located within these strips. (2) It might be beneficial to locate rest areas at more frequent intervals on long gradients (3) Public telephone requirements also include those in hotels, information booths and other public areas. |
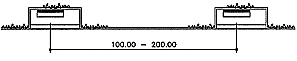 Fig. 1
|
4. Pathways |
|
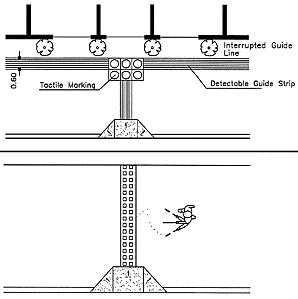
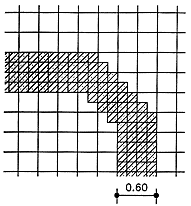
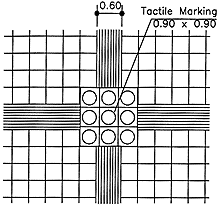
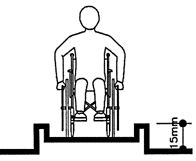
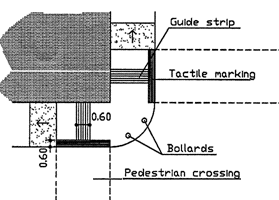
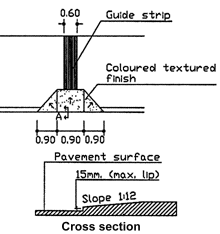
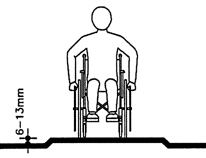
1. Problem identification Uneven curbs with obstacles and holes. Inconvenient or dangerous interruptions in the path of travel. Insufficient width. Changes in level. 2. Planning principle To provide clear, obstruction-free, level and wide pathways for the convenience of all users, especially the sightless and people with mobility problems. 3. Design considerations 3.1 General • Street pavements, pedestrian passages in open spaces and recreational areas, pedestrian underpasses and overpasses are all considered pathways or ramps. • Pedestrian routes in recreational areas and open spaces should be broken regularly by detectable obstructions such as plants and/or by changing the alignment to discourage bicyclists (see Obstructions). 3.2 Guide strips • The path of travel should be easy to detect by a sightless person using a long white cane. Natural guide lines (1) and guide strips are used to help identify travel routes. • A guide strip is a line means constructed in or on the road surface to facilitate orientation for sightless pedestrians in the following manner: (a) To replace missing natural guidelines fill gaps of more than 10.00 m in a guide strip (fig.1); (b) To guide to pedestrian crossings (fig.2) (see Curb Ramps; Pedestrian Crossings). • Guide strips should be laid in a simple and logical manner and should not be located close to manholes or drains to avoid confusing sightless people. • Guide strips should have a colour which contrasts with the surrounding surface for the benefit of people with sight problems. • The guide strip ridge profile should be parallel to the main direction of movement and should be flush with the top layer of the adjacent road surface so as not to hinder people with mobility problems. • Where travel routes change direction, there should be a gradual change in the direction of the guiding strip (fig. 3). 3.3 Tactile marking • Tactile tiling on the pedestrian route of travel should be placed at the following locations: (a) On a guide strip where alternative routes exist or at a junction of guide strips (fig. 4). (b) At a pedestrian crossing (see Curb Ramps; Pedestrian Crossings). (c) Around obstructions which are difficult for the sightless to detect (see Obstructions). • A tactile guiding area, preferably of rubber tiles (2) with minimum dimensions of 0.90 m x 0.90 m, should be constructed in a guide strip at cross pathways where the route branches off in several directions (fig.4). 3.4 Curbs • The height of a curb should be between 0.07 m and 0.15m. • Stepped curbs should be avoided, as they are hazardous to all pedestrians, especially in darkness. 3.5 Curb ramps • Curbs should not obstruct the free passage of physically disabled people, mainly wheelchair users (see Curb Ramps). 3.6 Width (fig. 5) • The minimum width of an unobstructed pathway should be 0.90 m. • The minimum width of a two-way wheelchair traffic passage is 1.50 m. The preferable width is 1.80 m. 3.7 Slope • The slope of an accessible path should not exceed 1:20. Pathways with a slope of more than 1:20 should be designed as ramps (see Ramps). • The slope across a path should not exceed 1:50. 3.8 Surface • The surface of an accessible pathway should be smooth, continuous, non-slip and even. • Pathways which are level and even with adjacent surfaces should be given a different texture and colour finish for differentiation. • Intersecting pathways should blend at one common level. 3.9 Gratings (fig. 6) • Gratings can be hazardous to wheelchair users, cane and crutch users, parents with prams and women with high heels. • Manholes, drains and gratings should generally be placed outside the pedestrian pathway. • Gratings should be flush with the pathway surface and should have narrow patterns of not more than 13 mm. • Elongated grating openings should be perpendicular to the pedestrian travel path. 3.10 Guards • For changes in level of more than 13 mm between the pathway and the surrounding surface, guards, upstands or other types of barriers should be used. • Guards with a minimum height of 0.15 m should be used to separate pathways from planting areas, pools and landscape features (fig. 7). • The edges of the pathway should be beveled wherever changes in level between 6 mm and 13 mm exist between the pathway and the surrounding area (fig. 8). 3.11 Landscaping • Plant varieties and locations within the travel route should be chosen with caution. • Thorny and poisonous plants should not be used immediately adjacent to pedestrian paths. • Plants that drop seeds and leaves creating a hazard underfoot should be avoided. • Trees with shallow roots are hazardous as the roots may breakthrough the pathway surface. 3.12 Obstacles and Signs (see Obstructions) 4. Existing constructions • Textured rubber adhesive tiles can be applied to existing pavement to avoid slipping and to warn sightless people. • Existing curbs that obstruct the pedestrian flow should be ramped (see Curb Ramps) • Existing pathways with steps, stairs or steep slopes need not be modified if an alternative accessible route exists. Notes: (1) A guiding line is a straight continuous line of detectable natural objects and defined edges (i.e., building frontages, grass verges, raised platforms, continuous railing, curbs, guards, low barriers, etc.). (2) The acoustic effect of the rubber tiles as compared with the surrounding surface will provide both a tactile and audible warning of the change in direction. |
 Fig. 1
|
5. Curb ramps |
|
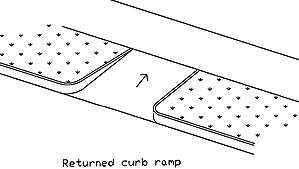
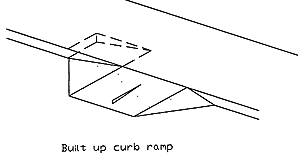
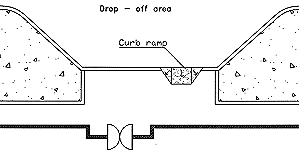
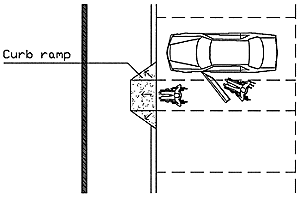
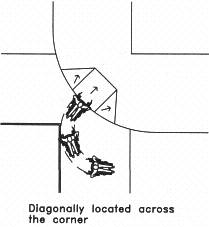
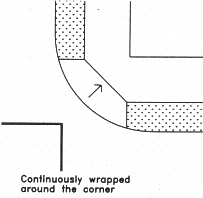
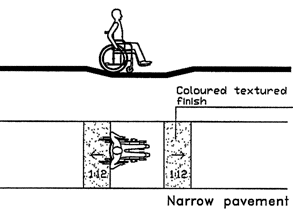
1. Problem identification Improperly designed transition or no transition at all between the curb and the street at pedestrian crossings and in the vicinity of building entrances. 2. Planning principle To overcome changes in level between the pavement and the road surface and also on the pavement itself. 3. Design considerations 3.1 General • Curb ramps are used wherever there is a difference in level on pedestrian paths or cross paths. • To avoid confusing sightless pedestrians, curb ramps should be positioned out of the usual line of pedestrian flow. The unobstructed width of the pathway should be not less than 0.90 m (see Pathways). • Curb ramps should be located away from places where water accumulates. 3.2 Types (a) Standard curb ramps: Cut back into the pavement with flared sides providing transition in three directions (fig. 1). (b) Returned curb ramps: (1) Providing slope in one direction. This could be a dangerous measure if the sides are not protected (fig. 2). (c) Built-up curb ramps: (2) Usually with flared edges (fig. 3). 3.3 Application • At each quadrant of each street intersection (fig. 4). • At each pedestrian crossing, on opposite sides of the street (fig. 4). • At drop-off zones, near building entrances (fig. 5). • Between accessible parking areas and pathways (fig. 6). 3.4 Curb ramps at intersections • At intersections, curb ramps can be installed in any of the following ways: (a) Directly in the path of travel (fig. 4). (b) Diagonally across the corner (3) (fig. 7). (c) Continuously wrapped around the corner (fig. 8). 3.5 Narrow pavement • Where the construction of curb ramps would affect the width of the travel route, the whole pavement should be lowered, at a maximum slope of 1:12, to provide the necessary level transition (fig. 9). • For narrow pavements lowered at a corner, the tactile tiling indicating the location of the pedestrian crossing could be constructed as indicated in figure 10. 3.6 Width • The minimum width of a curb ramp should be 0.90 m, excluding the sloping sides. The recommended width is 1.20 m (4) (fig. 11). 3.7 Slope • The maximum slope of a curb ramp should be 1:12. • The maximum slope of flares should be 1:12. • Level transfer is recommended between the curb ramp and the surface of a pathway. A lip not exceeding 15 mm can be used (fig. 11). 3.8 Guide strips • A guide strip painted in a contrasting colour should be constructed to guide sightless and partially sighted pedestrians to the location of the curb ramp (fig. 4). (see Pathway; Pedestrian Crossings) 3.9 Surface and colour • Curb ramps, including flares, should have a rough texture or ground pattern to make them detectable and slip-resistant. • The surface colour should be distinct and should contrast with the surrounding surfaces to guide pedestrians with limited vision. 4. Existing constructions • The maximum allowable slope for a curb ramp constructed along high pavements should not be more than 1:10. The maximum slope of the flares should also be 1:10. • If existing curb ramps do not comply with the above mentioned requirements, they should be modified. • For narrow pavements more than 0.15 m high, where the construction of curb ramps would obstruct the free passage of pedestrians: (a) The pavement can be lowered to the road level to obtain the required transition between the pavement and the road surface (fig. 9) (fig.10). (b) Built-up curb ramps can be constructed if they would not obstruct the required width of the road (fig. 3). Notes: (1) Returned curb ramps are unaccepted measures in some countries. (2) In some countries, such as Canada, built-up curb ramps are accepted only as remedial measures to overcome existing barriers, but not on public streets or pathways. (3) Corner curb ramps could be dangerous to wheelchair users if the pedestrian crossing is not wide enough. (4) The curb ramp construction at pedestrian crossings does not need to cover the whole width of the crossing. |
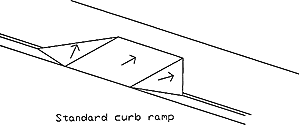 Fig. 1
|
6. Pedestrian crossings |
|
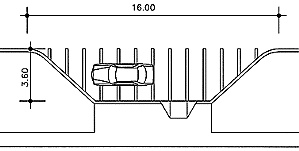
1. Problem identification Uneven road surface. Lack of guide strips. Lack of warning marking for crossings. Gratings on the road surface. 2. Planning principle To facilitate the safe and independent crossing of disabled people. 3. Design considerations 3.1 General • Pedestrian crossings should be equipped with traffic control signals. • Low-traffic crossings frequently used by disabled people can be controlled by a pedestrian push-button system. • Constructing traffic islands to reduce the length of the crossing is recommended for the safety of all road users. 3.2 Guide strips (fig. 1) • Guide strips should be constructed to indicate the position of pedestrian crossings for the benefit of sightless pedestrians (see Pathways; Curb Ramps). • A guide strip should lead to pedestrian light poles with push buttons for the benefit of the visually disabled. 3.3 Traffic signals • Pedestrian traffic lights should be provided with clearly audible signals for the benefit of sightless pedestrians. • Acoustic devices (1) should be installed on a pole at the point of origin of crossing and not at the point of destination. • The installation of two adjacent acoustic devices such as bleepers is not recommended in order to avoid disorientation. • The time interval allowed for crossing should be programmed according to the slowest crossing persons. 3.4 Push buttons • Push buttons should be easy to locate and operate and should be placed between 0.90 m and 1.20 m off the ground for the benefit of wheelchair users. 3.5 Traffic islands • The traffic island depth should not be less than 1.50 m. • The width of a traffic island should not be less than 1.50 m. • A coloured tactile marking strip at least 0.60 m wide should mark the beginning and the end of a traffic island, to guide pedestrians with impaired vision to its location. 3.6 Road hump • The road surface at pedestrian crossings can be raised to the same level as the pathway so that wheelchair users do not have to overcome differences in height (2) (fig. 2). 3.7 Surface • The road surface should be firm, well-drained, non-slip and free of construction joints. 3.8 Drains and gratings (see Pathways) 4. Existing contructions • The road surface should be firm, well-drained, non-slip and free of construction joints. Notes: (1) Experience shows that acoustical signals encourage safer crossing behavior among children as well (2) Road bumps are also helpful in reducing the speed of traffic approaching the intersection. |
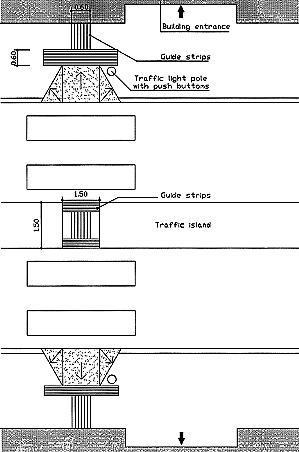 Fig. 1
|
7. Parking |
|
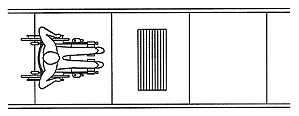
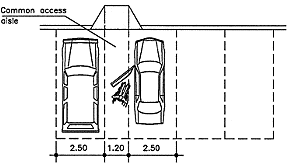
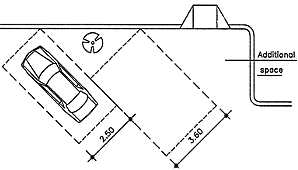
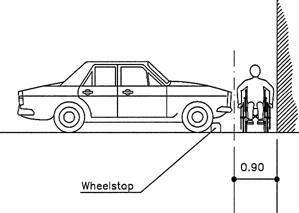
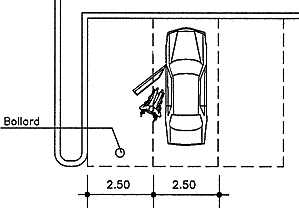
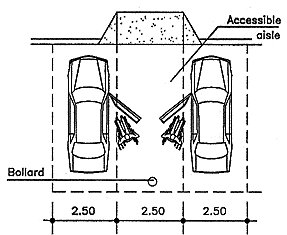
1. Problem identification Poor parking facilities. Insufficient width of the parking aisle. No allocation of parking space for the disabled. 2. Planning principle To provide accessible parking facilities as close as possible to the point of destination. 3. Design considerations 3.1 General • Accessible parking provisions apply to both outdoor and underground facilities. • For multi-storey indoor parking facilities, at least one level should be served by an accessible elevator. 3.2 Number • For parking facilities of less than 50 cars, at least one accessible parking space should be provided in every parking facility. • For parking facilities of a maximum number of 400 spaces, accessible parking spaces should at least be provided in the ratio of 1:50 (one accessible space for every 50 spaces). • For parking facilities of more than 400 spaces, at least 8 accessible parking spaces should be provided plus 1 space for each additional increment of 100 cars over 400. 3.3 Location • For outdoor parking, accessible parking spaces should be located not more than 50 m from accessible building entrances. • For indoor parking, accessible parking spaces should be located right next to accessible elevators, or as close as possible to exits. • The ends of rows are preferable for vans with lifts for wheelchair users. 3.4 Dimensions • The minimum width of an accessible parking space is 3.60 m. The recommended width is 3.90 m (fig. 1). • An access aisle 1.20 m wide can be located between two ordinary parking spaces (fig. 2). • For indoor parking, the minimum height clearance for vans with hydraulic lifts is 2.40 m. • Where parking spaces are angled, the extra space at the end of a row can be used as a parking aisle for disabled persons (fig. 3). 3.5 Parking curb • If a curb exists, curb ramps should be provided to link accessible parking spaces to accessible pathways (fig. 2). • If no curb exists, a textured surface at least 0.60 m wide is needed to separate the pathway from the vehicular area; otherwise bollards should be used (see Street Furniture). Pre-cast wheelstops can also be used to set apart a passage at least 0.90 m wide (fig. 4) (fig. 5). 3.6 Curbside parking • Curbside parking is dangerous for disabled people unless it is designed as an accessible drop-off area. 3.7 Drop-off areas (fig. 6) • Drop-off areas are beneficial for picking up and dropping off people with physical limitations, parents with children, people carrying loads, etc. • Drop-off zones should be provided at public transport stops such as bus stops, and not more than 30.00 m from accessible building entrances. • The drop-off area should be at least be 3.60 m wide and incorporate an aisle 1.20 m wide to allow for manoeuvring. The length should accommodate at least two cars. • Appropriate curb ramps should be provided to facilitate circulation over paved surfaces. • Where no curb exists to mark the separation between pedestrian and vehicle zones, the installation of a cue is necessary to guide sightless pedestrians: (a) Bollards may be used (see Street Furniture); (b) A tactile marking strip at least 0.60 m wide can be constructed at the edge of the pathway to warn of the transition to a vehicular area. • A protected shelter or canopy with seating facilities is a recommended design feature at passenger loading zones. • Signs should be installed to identify a drop-off zone and prevent its misuse as a parking space. 3.8 Surface • The surface of a parking facility should beuniform and smooth. • The slope of a parking ramp should not exceed 1:20. 3.9 Signs (fig. 7) • Accessible parking areas should be marked by the international symbol of accessibility. (1) 4. Existing constructions • If the parking area is more than 50.00 m from the building entrance, a vehicular drop-off area within 30.00 m of the entrance should be built or an accessible parking space close to the entrance should be constructed. • If no accessible parking space is available, one of the following measures should be implemented: (a) Block a peripheral regular stall with bollards to get one accessible parking space (fig. 8). (b) Block a central regular stall with bollards to get two accessible parking spaces (fig. 9). (c) Two accessible parking aisles (fig. 9). • For indoor parking spaces with clear height of less than 2.40 m, alternative outdoor provisions for vans carrying disabled people should be provided. Notes: (1) An exacting fine can be imposed on non-disabled drivers who park in a parking space designated for the disabled. |
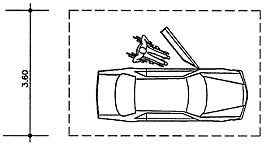 Fig. 1
|


| Назад | Оглавление | Далее |